Saturday, July 28, 2012

Things are Rolling Along

North Side with the new roof
It was a busy week up here as we've been getting ready for our rough-framing inspection as well as the rough plumbing / electrical inspection early next week. On the exterior - we've finally topped out for real! the last of the sleepers / roof-framing went in early this week and our roofers made quick work of getting us dried in (though thanks to our backup Solitex roof we've been 'dry' for a while now). 


John installing the last of the roof board sheathing
The finish roof boards are visible from below and so lots of care had to be take with the framing and finishing: lots of sanding, staining and careful handling. You can see the finished detail in the image below with the exposed rafter tails and the board sheathing giving a real 'cabin' feeling to the house. That is the same stain we'll be using for the siding as well. The new roof has changed the profile and proportions of the house quite a lot and we're all real happy with it. 


Inside, the gang have been working hard to get electrics, plumbing and ventilation ready for inspections. One exciting new piece is the kitchen island which Jason started framing yesterday. Below you can see the main kitchen living space under the loft. The 'Core' of framing you see in the center houses kitchen appliances as well as the bathroom inside. By moving all the utility and services to this little core we moved all the plumbing and most of the electrics off the exterior walls. This simplifies our air-sealing and increases the efficiency of our insulation. It also just makes things a bit easier to have it all centralized rather than spread throughout the house. 


Below, you can see the kitchen framing on the left, and the end-result (eventually) on the right


And outside I've been picking away at the decks. The entry deck is finished up and thursday I began framing the big south-deck. There is going to be plenty of space here for outdoor eating as well as storage space for wood (for the wood-stove) and more than enough room for folks to stretch out a bit. The decks also do a lot to embed the house down into the ground as well so it feels less like its towering over the landscape (although - the 20" of soil we'll bring in all the way around will help with that as well!)

South side with all the windows in and the deck framing. No door just yet though cus' of some ordering mix-ups.

View of the lake from the south deck.

South Deck framing.
So - things are coming along. A little less dramatically then during the framing stage (thats always the way though) but by the end of next week we should be moving into the finish woodwork stage and then we'll really begin to see the house come to life.


Sunday, July 22, 2012

White Pine and the Woods of Northern Wisconsin

An enormous old-growth White Pine along the Cathedral Pines trail
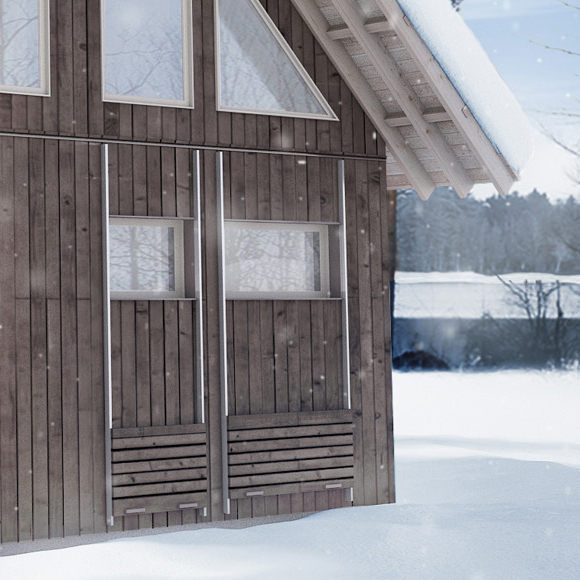
You can still find many buildlings up here constructed using a 'log-cabin' technique, that is: piling up full logs to form the walls of a structure. While the original log-cabins in this country were mostly built as part of logging camps or the homes of poor farmers - this method of construction spread to wealthy summer homes and lodges by the late 1800s and early 1900s. Today, log cabin style homes are still quite popular and you can even buy log-cabin 'siding' that mimics the look of the traditional materials. While our new high-performance cabin is most certainly not a log-cabin, we are still very interested in the history of the region and have tried to integrate certain aspects of the material culture here into the new house in several ways. 

One way we're trying to do this is through a generous use of traditional white-pine as an interior and exterior cladding material. All the vertical siding on the house will be stained White Pine and the interior will be almost entirely wrapped in Pine as well, with a simple clear oil applied to maintain as much of the original character of the wood as possible and keep the inside very light and open. 

Eastern White Pine, of course, was one of the most important species in the development of this region - and much of the mid-west US as well. White Pine was, at the time of colonization, spread extensively across the eastern and great lakes areas of the US. However, it's now estimated that less than 1% of these original tracts remain, due to extensive logging starting even before the Revolutionary War and continuing until the present day. Most of the largest and highest quality old-growth wood was harvested in the middle and late 1800s however as the railroads and technology allowed loggers to work in areas that would have been too expensive or remote previously. 

Photograph of loggers with large White Pines in virgin forest land

Originally very valuable to the British as material for the masts of sailing ships, White Pine became a primary building material in the mid 1800s and was used for everything from finish flooring to wall studs and structural beams. A very soft wood, White pine is creamy colored for the most part, with yellowish or sometimes blueish rings and grain figure (the blue often means that the wood was infested with a fungus because the un-milled logs sat for too long in the lumber-yard during the summer months). Pine doesn't have any of the natural weatherproof ability of, say, a Cedar, Redwood or Ipe - but with regular staining it can be used as an exterior siding material just fine. Its very easy to work with and good wood will stay much more dimensionally stable than lots of other similar woods (Hemlock or Spruce esp) - one of the many reasons loggers searched it out disregarding many other species along the way. Distinctively, White Pine contains five needles per bundle (Red Pine has only 2) and the bark is a grey-silver which starts smooth but develops into deep crags as the tree ages.

Thick bark of a particularly old White Pine along Cathedral Pines trail

While the simple fact of existence of such huge forests explains much of the particular history of this region - the history of the logging in Wisconsin is also closely linked to the growth of Chicago and the prairie states. Logging operations in Wisconsin have always been centered around exporting their crop: after all - just cus' you cut is down doesn't make it valuable, you still need to be able to get it to where the market is (which was not in wisconsin). In the central and western parts of the state, the Wisconsin River provided the main thoroughfare to mills and markets downriver, esp. in and around St. Louis. On the eastern side of the state - it was all about Lake Michigan and Chicago. Chicago's growth as the center of the lumber trade coincided with two particular trends, the growth of a market for timber in mid-west and prairie states where trees were scarce but farm-land valuable, and the extension of railroad technology. 

Logging operations in Northern Wisconsin before the 1880's were mostly along rivers and streams. These natural highways allowed loggers to harvest and move their timber to Lake Michigan's Green Bay where they would load it onto barges and ships. These loads would then travel to Chicago where they were purchased by national firms and distributed south and west. 

River Drive
Typically, lumber camps would be erected in the late fall, with logging operations beginning during early winter. The frozen ground allowed horse or oxe drawn sleds to move great volumes of timber to the river banks where they would be stored until spring. Once the spring thaw rose river levels, the river drive would move lumber down to small coastal mill towns like Oconto or Marinette. White Pine was especially suited to this technique - Hemlock (another common species in the north woods) was said to float too low in the water to drive successfully, and native hardwoods didn't float at all - making them all but impossible to move from the north woods to the mill-towns. 

Horse-drawn winter sled with Pine lumber
But with the extension of the railroads, lumber companies were free to range further inland and expand their operations year round (since they didn't have to rely on frozen ground for easy movement). Because Chicago was able to turn itself into one of the most important railroad hubs during the late 1800s - the market there naturally became a vital middle-man between the Wisconsin lumber jack and the Prairie farmer. After railroads began to expand, timber harvesting expanded wildly and soon - like in the rest of the country, virgin White Pine stands began to disappear. The end of the river drive technique also meant that species such as Maple and Hemlock could begin to be harvested in addition to Pine. 

See the figures in the bottom of the ravine for scale
A great read on the development of the wisconsin forests and its relationship to chicago is William Cronon's fantastic history: Natures Metropolis

Sadly, this has left only a very few small areas of original old-growth White Pine left. Yesterday I was lucky enough to be able to go visit one of the largest stands of such forest left in the US - an area called the Cathedral Pines, located in the Nicolet National Forest


You can see in the areal shot below, the stand is a rough circle - approx 30 or 40 acres of original Red and White Pine and Hemlock - which stands out against the younger growth around it. It is very easy to access and the main trail loop only takes 40 mins or so depending on your speed and ability. There were a LOT of fallen trees though - so if your not up to climbing up or under I wouldn't recommend. 


This area around Archibald lake was once a large logging camp for the Holt and Balcom logging company (active here in the late 1800s and early 1900s). Later becoming a summer home of the owner and his wife, Lucy Rumsey Holt, the area of the Cathedral Pines was put aside at Mrs. Holt's request and in the 1960s passed to the state government. Now, the pines represent a tiny snapshot of what the pre-colonial forests covering this country must have felt like. 

Almost all of the pines here stand over 120' tall - with several notable specimens over 150' and massively thick. While they haven't been dated too closely - most are thought to be well over 200 years old, with some possibly as old as 400 years. It's a beautiful park and its amazing to think that this might be one of the last areas of a a forrest type that once covered half a continent but now might disappear entirely. 

Cathedral Pines. The dead tree in the center was killed by acidic Blue Herron droppings (note the nests up in the tip-top)
Today - we're lucky to have even a few of these areas left. While we are following in the tradition of building with White Pine and appreciate its importance to this region - the lumber we purchase these days is all harvested locally to the cabin and entirely grown on large plantations or new (less than 100 years old) stands. Thankfully, we have a great lumber company nearby that understands the importance of protecting and managing Wisconsin's forests well. The work of companies like this and the FSC, along with progressive state and federal policies, allows us to continue to use materials that evoke the history and culture of this region without the same catastrophic environmental effects created by historic logging practices. 


Sunday, July 15, 2012

Exterior Detailing is all About Layering

"Un-Battened" house form
You may have noticed that the images of the house so far have been pretty "streamlined". As you can see in the image above - there are very few protrusions or extra elements on the main house. This is mostly to keep our thermal and air boundaries crystal clear and facilitate efficient sealing and weatherproofing. Running a big sheet of membrane over a surface is orders of magnitude easier than trying to seal around things like joists or rafter tails. The 'tight' form is also a by-product of our attempts to eliminate all thermal bridges and keep the overall massing of the house very simple. 

But, there are exterior detail elements that will be present in the final house - things like rafter tails, window trim and siding all need to the added - and to do that, we add lots and lots more layers to our little house. 

As you can see in the detail from an earlier conceptual rendering below - we are going to have exposed rafter tails and exposed board-sheathing on the roof eaves and rakes. This material effect replicates a construction detail seen on many of the other cabins in this region, and is very common on lots of old 'summer' cabins you'll find in other rural areas. The deep rakes help a great deal to shade our south windows in the summer time - and deep eaves will increase the wall durability by keeping water and snow far away from the finished siding. 

Zoom of a early rendering - you can see the exposed rafters and board-sheathing

But having a rafter extend out through the thermal boundary was obviously not going to work with our  energy-efficiency goals. So we decided to build all the roof elements up on top of the thermal boundary. Below you can see John and Jason installing 'sleepers' onto the existing roof. Basically, these are just 2x4s and will have a final layer of sheathing installed on top of them - this creates a nice vented cavity which will eliminate any worry about ice-damns in the future. (though - with all our air-sealing, that really shouldn't be a problem anyway). The finish roofing will then be installed on this upper roof. Once the rafter-tails had been cut (which took a hot-minute or two!) the install process goes really quickly. It also gives us, in effect, two roofs -which means I don't anticipate we'll have any call-backs  cus' of leaks for the first couple hundred years of this house's life. 

John and Jason adding 'Sleepers' above the Solitex Roof Membrane
The walls are a bit different than the roof, but the same principles apply. We basically take our simple house form and add layers to achieve the desired finish - whether that is about aesthetics, waterproofing or any other environmental condition. 

We're installing what is known as a 'rain-screen' facade on this house, and that basically means that the siding is only one layer our of weather defense. We expect some water to make its way behind the siding - that's why we wrapped the house in a high-tech, water-proof membrane. The finish siding is held away from the membrane by battens which allows air to flow freely behind it - this means any moisture vapor back there will be able to dry very easily and increases the durability and lifespan of the siding significantly. 

Lake-Side, first layer of wall battens and most of the roof 'sleepers' installed

The first layer on the walls is to apply vertical 1x battens over the weatherproof membrane, which can be seen in the image above. Even though we are going to have vertical siding - we can't just apply horizontal battens since this would create lots of drainage problems on the back. So a layer of verticals, then a layer of horizontals, then the finish siding. 

Pretty straightforward - but like everything else, it gets complicated around windows and doors. As you can see in the detail below, at the window sills we need to go through a bunch more layers in order to protect the house correctly. After the main water-proof layer has been installed, we'll add a sloped exterior sill which is then taped to the window. Any wind-driven rain or snow that makes its way behind the trim will get directed outwards by this slope. We've then got some rigid foam  insulation and the exterior trim - in this case 2x material. 


Below - you can see a little mockup we made on Friday to test some ideas about how to really put this all together. You can see the window trim and a couple of sample siding boards in lower right corner. 


Zooming in, you can see I've pulled the layers back a little bit so you can actually see how things are put together. The idea is that most rain water and snow will flow off the primary window trim (01) (A) since the sill is sloped outwards. If any melting snow or wind-driven rain (C) does make it uphill and get behind the trim, it will flow out over the tape (2) and rigid foam insulation (3) under the window. Since the siding is held off the waterproof membrane - this water will simply drain out the bottom without causing any trouble. 

The first layer of wood battens are vertical and you can't see them here - but you can see a special product used to seal off the cavity behind the siding. We add Cor-A-Vent SV5 Siding vent (4) at the top and bottom of the walls and around all the windows. This product allows water and air (B) to flow through easily but has a built-in bug screen to keep all the critters from living in the nice warm, dry space behind our siding. I know the bees gotta live somewhere . . . but it isn't gonna be here I'm afraid. 

Then a final layer of horizontal battens (5) and the White-Pine vertical siding (6). The siding and trim will all be stained - but the battens will be left raw. Since they will be protected from UV damage, and are vented enough to let them dry out if they ever do get wet - we really don't need to worry about them very much at all. 


Its a lot of pieces and work, I know. But it will make for an incredibly durable and effective exterior protective coating once its all finished. 

Sunday, July 8, 2012

Operation Fenestration

Bay-Side push-out casement window

Friday we received delivery of our windows and, except for a few exceptions, we're almost all installed. Keep in mind this house is used mostly in the winter - and all the heat for the house comes entirely from a wood stove. As such - it's very important  to capture as much passive solar heating as we can during the winter months. So window detailing and layout was something we spent a lot of time and energy on during the house design. After a lot of testing and back-and-forths, we ended up going with Marvin Clad Ultimate Casement windows for the majority of the house. There are a couple awnings for special spots and some fixed triangles for the gable ends - but mostly its big 5'x5' double units punched through our thick walls. 

Since we are trying to gain as much heat as possible, the plan and orientation of the house are driven to a large degree by this solar access. We placed the private bedrooms and entry spaces to the north side of the house, allowing us to open up and add lots of glass to the main living room and kitchen space to the south. The south wall is almost entirely glass and should bring in lots and lots of daylight and heat during the winter months. 

Looking South towards the living room with the lake to the right

The install went very smooth, and I'm very impressed by the Marvin units. They are regular flange-mounted units with Doug-Fir interiors and Aluminum Clad exteriors. The hardware and exterior cladding seem real durable which is a real serious consideration given the harsh climate up here. There is a whole lot to say about why we decided to go with domestic windows instead of importing some true Passive-House certified units. But instead - I'll simply say we've gone the imported fancy-window route in the past, and the combo of schedule, cost and logistics weighed very heavily on purchasing locally this time around. 

John and Jason installing one of the big ones


But - even though these are traditional window units, the install was still complicated by our super-thick walls and our concerns about long-term durability in a tough climate. One thing we really wanted was to be able to mount the windows in the center of the wall assembly. This way we eliminate any super deep window sills on one side or the other. They are still gonna be deep (around 6") - but at least there aren't any 14" deep sills anywhere. 

Additionally - there are real thermal benefits to mounting windows as close to the center of a wall assembly as possible, though I won't go into all that business now. 
Typical window installation details
In addition, by mounting in the center of the wall, we definitely decrease the likelihood that any water will seep its way in - increasing durability (so long as we deal with the deep exterior sills well). We also liked the aesthetics of thick walls with window 'punches' which is created by the set-back glass. 

An inset window from the exterior. The Solitex wraps in under the window flanges as a first level of flashing.  We'll then add insulation and tape to the frame for a second layer.  

So to do this we lined all our window openings with plywood first, then mounted 2x nailers around the center of the window opening. Just compensate for the added thickness when building the rough-openings and thats that. 

Below you can see the finished mounted window on the left, and the prep'd window opening on the right. The plywood also serves to help tie the walls together really well and increase our stability. Its certainly not the simplest detail and not nearly as easy as just mounting the windows to the outside, but I really like how protected and covered the windows now are. 

South-East corner looking toward the bay
regular 2x sill, 3/4" OSB ties the two walls together, then 2x nailers
All this extra wood will get covered by rigid foam insulation and then taped (a topic for another post). We'll then build Doug-Fir extension jambs for everything to finish it off. 

Typical Window Sill detail. Foam insulation over the extra framing. 
The windows on this house are very high-performing units and we selected glazing types to match the specific orientations. The west side units (sort of North-West really) and the north are all 3/4" double-glazed LoE II 272, argon filled. These have a U of 0.3 and and SHGC of 0.29. But on the south, we wanted to allow lots of solar heat to come into the space - so we opted to go with Marvin's triple glazed 1" LoE 180 Argon filled units. These have a better U value (0.25) and a better SHGC (0.39) - but they are a bit more expensive so we only used them where we knew they would have the biggest impact on the overall heating of the space. 

Marvin Double-Glazed unit.
I'll be sure to post more about these window details as we move into the air-sealing phase. But for now, its just nice the be able to keep the rain on the right side of the wall.

South End view - almost done framing the gable-end

Tuesday, July 3, 2012

Closing Up

Yours truly: ridge workin
Well its been a tough 8 day stretch, but the house is almost fully framed in and we got the temporary roofing installed - so now the whole place is a LOT more waterproof than before. Hopefully we'll keep at least a few of the wisconsin storms from floodin' the basement from now on. 

the house on friday - ready to get closed up

This past weekend and first of this week was all about closing up: gettin' the roof waterproof and sheathing the walls. 

Sheathing the Lake-Side walls
The walls on this house are very different than a traditionally framed home - and not just because of the super insulation and the air sealing. In addition to being made of two 2x4 studs walls 12" apart and filled with blown cellulose insulation, the walls are framed sort of the 'reverse' of most double-stud walls. Most use the 'exterior' 2x4 wall as the primary wall - carrying the loads and doing most of the work. We chose to make the 'interior' wall our primary load-bearing wall. This frees us up to over-insulate all the window headers as well as the rim-joists at the sill and the roof eave connections and make an almost totally thermal-bridge free construction assembly. 
Typical Roof Eave-to-Wall Detail: note the Over-Insulated rafter ends and Rim-Joist
In addition to this sort of 'inside-out' double stud wall - we've chosen to use fireproof Glass-Mat sheathing on the exterior of the home and utilize 1x4 diagonal bracing for all our shear requirements. What this means in practice is that instead of plywood or OSB wrapping the walls of our house - we have bright green sheetrock!

(the wall is actually very similar to one that 475 showed in their blog a little while back here)

USG Securock sheathing. Awesome Green color too.

We went with USG securock glass-mat sheathing. It is 5/8" thick and is classified as Type X. Since the last cabin burned down in a small forest-fire, the owners were very excited about this fireproof quality. In addition, it has a Perm rating of 26 (for 5/8") which means it will be a very vapor-open exterior sheathing, which is important as it will let our walls dry towards the outside if any moisture does work its way into the wall cavity. 

Close-up of the Glass Mat sheathing exterior coating

You can see in the close-up here, it is basically standard gypsum core with a funny waxy, fibrous coating on the outside, instead of the normal drywall paper we're all used to. It went up very well - its heavy of course, but the guys got the whole main house sheathed very quickly. 

But at the same time - it was all up in the air for the roof-crew. The 12/12 pitch on this roof is just about as steep as they get, and while 30' above ground doesn't sound too bad when you say it: it sure feels high when your up there!

Roof sheathing going up - Lull style.
John - installing rafters

The roof detail is very similar to our ground floor detail: the whole idea was to avoid as much thermal bridging as we could, and to keep as much of the material warm and dry to increase durability over the long term. So we used our 'outside' wall to cover the rim-joist which would normally be on the exterior of the house. This allows us to fully cover it with insulation. the detail here is a little more complicated because of the sloped top-plate and the precision to which everything needs to be cut and built. But all in all it worked out great.

Typical roof eave detail

One interesting thing to note in these drawings (from a few months ago) is the extra foam insulation we had planned to add to the top of the sheathing. However, after working with our consulting engineer, the NYC firm Baukraft, they taught us that this wouldn't work at all and would actually lead to a serious potential for condensation to occur on our roof sheathing (a definite no-no). The reason for this is that if you want to put a vapor-closed insulation (like foam) on the outside of the house it needs to be AT LEAST thick enough to keep the sheathing above the dew-point, otherwise any moisture vapor in the wall cavity will condense there. Given the wisconsin climate and the thickness of the rest of our ceiling, we figured this would need to be way too much insulation for our assembly and would lead to more trouble than its worth. So . . . no extra insulation. 

Jason, installing Rim board on the ends of the rafters - note the 'exterior' wall with the sloped top-plate

The finished detail - the roof sheathing ties the two wall layers together here and 'caps' the insulated wall cavity

Carrie, spider-man style

roofing

me, finishing up the north ridge

For the exterior waterproofing we decided, like for the air-sealing, to try out the Pro-Clima system on this house. That meant we used the Solitex Mento 1000 3-layer wrap instead of regular tar-paper or something like a tyvek house-wrap. (thanks again to 475 High Performance Building Supply for their help in spec'ing this product and install details!) This membrane is used as a sub-roof waterproofing, as well as the waterproof layer below our final rain-screen facade (more on that later).

The Solitex is another super-engineered wrapper, with a very high vapor permeability rating to, again, make sure to let our walls dry to the outside. Inaddition it is SUPER durable - and held up incredibly well to us walking and siting on it. Its also like 1/3 the weight to tar-paper and very 'grippy' which made the roofing a lot easier than with a traditional product. We decided not to tape our seams or nail-holes, these will all be getting covered by battens later so we can save some time and tape that way.


Jason lying down Solitex. Nice big 5' rolls cover a lot of ground fast.
The Solitex Mento 1000 - we are using the 3-layer version here

Zoom of the Solitex: its more like a shirt or some sort of fabric than a paper or wrapper. 
Delaminating the 3 layers

The 3 Layer Solitex is made of a top layer of water-resistant polypropylene microfiber which covers the middle layer and protects from abrasion and UV damage. The middle layer is a stretchy, plastic-y film they call a 'Specialist Film' - this is the water-proof yet vapor open layer. Then underneath is a reinforcement layer again made of polypropylene. Very cool product and real easy to use. In terms of price / SF and ease of install - it don't think it really matches like, lets say a Huber Zip sheathing (12-16 perms) or something like that.  But I still like it a lot and for a roll membrane it's certainly the nicest one I've worked with. It's also applicable for a true rain-screen facade where the Zip is not - so that is one big reason we decided to go with it on this house.


But for now its a few days of R+R for the holiday, then right back to it.