 |
| "Un-Battened" house form |
You may have noticed that the images of the house so far have been pretty "streamlined". As you can see in the image above - there are very few protrusions or extra elements on the main house. This is mostly to keep our thermal and air boundaries crystal clear and facilitate efficient sealing and weatherproofing. Running a big sheet of membrane over a surface is orders of magnitude easier than trying to seal around things like joists or rafter tails. The 'tight' form is also a by-product of our attempts to eliminate all thermal bridges and keep the overall massing of the house very simple.
But, there are exterior detail elements that will be present in the final house - things like rafter tails, window trim and siding all need to the added - and to do that, we add lots and lots more layers to our little house.
As you can see in the detail from an earlier conceptual rendering below - we are going to have exposed rafter tails and exposed board-sheathing on the roof eaves and rakes. This material effect replicates a construction detail seen on many of the other cabins in this region, and is very common on lots of old 'summer' cabins you'll find in other rural areas. The deep rakes help a great deal to shade our south windows in the summer time - and deep eaves will increase the wall durability by keeping water and snow far away from the finished siding.
 |
| Zoom of a early rendering - you can see the exposed rafters and board-sheathing |
But having a rafter extend out through the thermal boundary was obviously not going to work with our energy-efficiency goals. So we decided to build all the roof elements up on top of the thermal boundary. Below you can see John and Jason installing 'sleepers' onto the existing roof. Basically, these are just 2x4s and will have a final layer of sheathing installed on top of them - this creates a nice vented cavity which will eliminate any worry about ice-damns in the future. (though - with all our air-sealing, that really shouldn't be a problem anyway). The finish roofing will then be installed on this upper roof. Once the rafter-tails had been cut (which took a hot-minute or two!) the install process goes really quickly. It also gives us, in effect, two roofs -which means I don't anticipate we'll have any call-backs cus' of leaks for the first couple hundred years of this house's life.
 |
| John and Jason adding 'Sleepers' above the Solitex Roof Membrane |
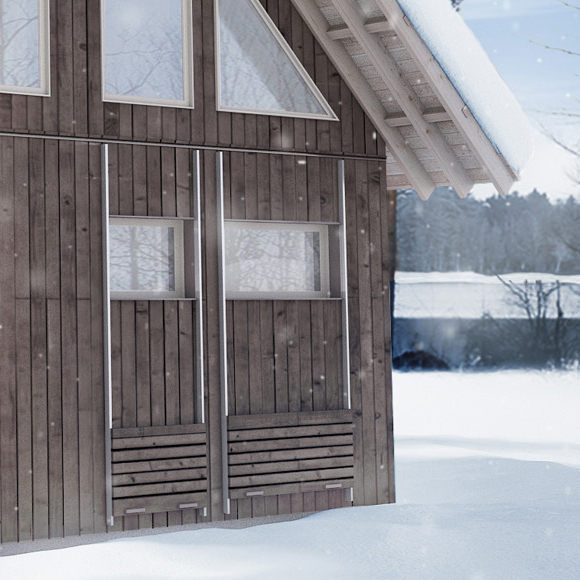
The walls are a bit different than the roof, but the same principles apply. We basically take our simple house form and add layers to achieve the desired finish - whether that is about aesthetics, waterproofing or any other environmental condition.
We're installing what is known as a 'rain-screen' facade on this house, and that basically means that the siding is only one layer our of weather defense. We expect some water to make its way behind the siding - that's why we wrapped the house in a high-tech, water-proof membrane. The finish siding is held away from the membrane by battens which allows air to flow freely behind it - this means any moisture vapor back there will be able to dry very easily and increases the durability and lifespan of the siding significantly.
 |
| Lake-Side, first layer of wall battens and most of the roof 'sleepers' installed |
The first layer on the walls is to apply vertical 1x battens over the weatherproof membrane, which can be seen in the image above. Even though we are going to have vertical siding - we can't just apply horizontal battens since this would create lots of drainage problems on the back. So a layer of verticals, then a layer of horizontals, then the finish siding.
Pretty straightforward - but like everything else, it gets complicated around windows and doors. As you can see in the detail below, at the window sills we need to go through a bunch more layers in order to protect the house correctly. After the main water-proof layer has been installed, we'll add a sloped exterior sill which is then taped to the window. Any wind-driven rain or snow that makes its way behind the trim will get directed outwards by this slope. We've then got some rigid foam insulation and the exterior trim - in this case 2x material.

Below - you can see a little mockup we made on Friday to test some ideas about how to really put this all together. You can see the window trim and a couple of sample siding boards in lower right corner.

Zooming in, you can see I've pulled the layers back a little bit so you can actually see how things are put together. The idea is that most rain water and snow will flow off the primary window trim (01) (A) since the sill is sloped outwards. If any melting snow or wind-driven rain (C) does make it uphill and get behind the trim, it will flow out over the tape (2) and rigid foam insulation (3) under the window. Since the siding is held off the waterproof membrane - this water will simply drain out the bottom without causing any trouble.
The first layer of wood battens are vertical and you can't see them here - but you can see a special product used to seal off the cavity behind the siding. We add Cor-A-Vent SV5 Siding vent (4) at the top and bottom of the walls and around all the windows. This product allows water and air (B) to flow through easily but has a built-in bug screen to keep all the critters from living in the nice warm, dry space behind our siding. I know the bees gotta live somewhere . . . but it isn't gonna be here I'm afraid.
Then a final layer of horizontal battens (5) and the White-Pine vertical siding (6). The siding and trim will all be stained - but the battens will be left raw. Since they will be protected from UV damage, and are vented enough to let them dry out if they ever do get wet - we really don't need to worry about them very much at all.

Its a lot of pieces and work, I know. But it will make for an incredibly durable and effective exterior protective coating once its all finished.